
These articles provide answers to some of the questions posed by applicants.
If you’re a new user and you haven’t yet set up your account, please read this article first: Setting Up Your Account.
Adding Another User to an Account
Currently, we recommend that each organization has a single applicant account. That main account is owned, controlled, and managed via a single set of login credentials (email address and password). If you want others to be able to access the full account, you will need to share with them your login credentials.
If multiple people will need access, we recommend setting the email address associated with the account to either be the person who will be primarily responsible for managing your organization’s applications or a general email address, perhaps even an alias that sends emails to multiple people who will be managing your applications. After establishing the login credentials for the account and adding the applications, you can add additional users to specific applications as collaborators by following the instructions below, or share the login credentials for the main account.
Inviting Another User to Work on an Application
You can add other users to an application via the Collaborator feature.
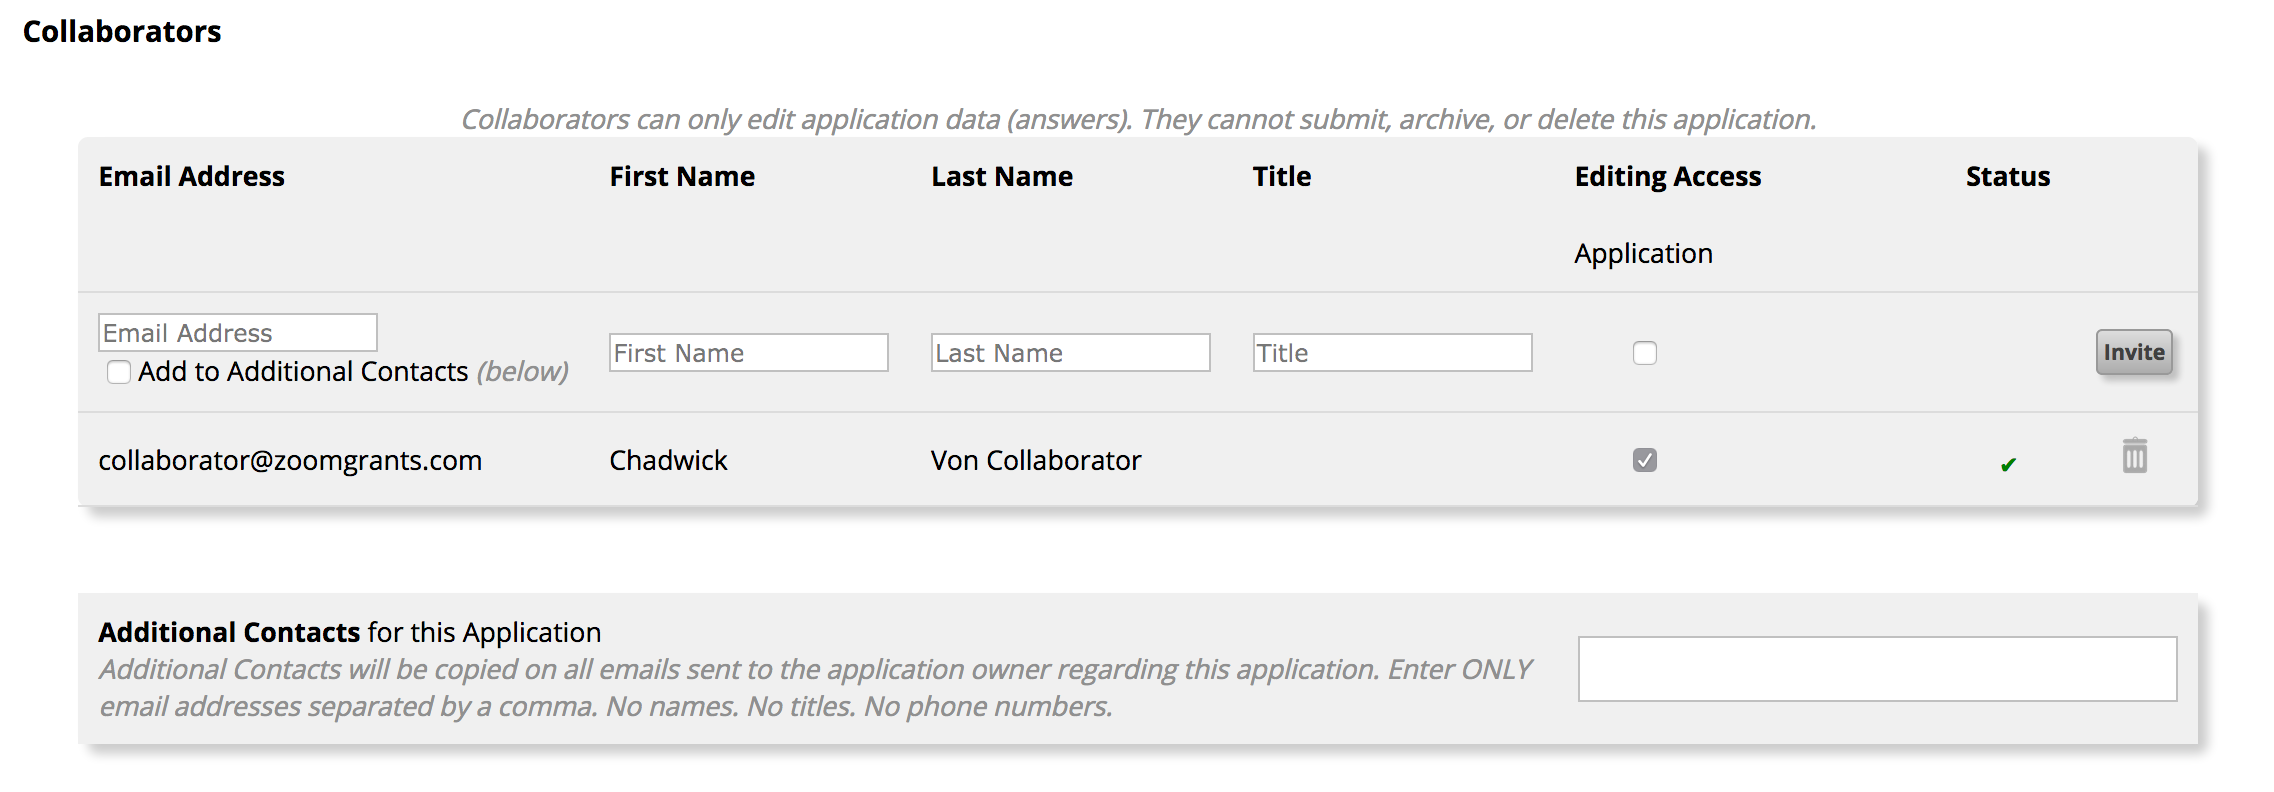
If you’re the application owner, you can find the Collaborator feature near the bottom of the first tab of any application in your account. (If you’re not sure where to find your application, read more here.) Input the person’s email address, then check the box(es) to give them access to different sections of the application. Click the Invite button when you’re done. They will receive an email invitation from Notices[@]ZoomGrants.com.
If they already have a ZoomGrants account, they can log in on https://ZoomGrants.com/Invitations.asp using their normal email address and password. If they do not have a ZoomGrants account, they will be given a temporary password that they can use to set up their account.
More than one user can work in the same application at once (even in the same account, if you’d like!). Just be sure to read the note about the Auto-Save feature, below.
Some very important notes about the collaborators:
First, only the application owner can submit, archive, or delete an application or edit the Applicant and Organization Information fields in the application. Collaborators cannot do any of those things. If the application owner has created an application and will not be available when the application will be submitted, they should share their login credentials with someone who can submit the application in their account in their absence or request that the application be transferred to someone else’s account (read more about the latter here).
Second, the application owner is the only person who can add or remove collaborators or update their access permissions. Neither the program administrator with the funding organization nor ZoomGrants tech support staff can update access permissions or add or remove users from applications. If an application is approved and the applicant is asked to submit reports or invoices or to sign contracts, the application owner may need to update the collaborator access or invite new users to complete those tasks. Collaborators can see all of the sections of the application but can only work on the ones that they’ve been given access to. If you’re an applicant, you can do that by logging into your account, finding the application, and then checking the new boxes to give your collaborators access to the additional sections.
You can read more about collaborators and additional contacts here.
Third, if two (or more) users are working on an application and are in the same field at the same time, the Auto-Save feature will automatically save the last change that was made, whether or not the users are logged into the same or different accounts.
Multiple users can work on the application concurrently, but they should not edit the same question at the same time, as the last person to save their answer will ‘win’. It is important that users either work on completely different questions, sections, or tabs, or that they reload the page (using the Refresh Page button in the upper right corner of the application) to ensure they are seeing the latest version of the application before making any additional changes.
For example, two users – Jill and Matt – are working on an application at the same time. Jill inputs an answer to question #5 then clicks outside the box to save her change. At the same time, Matt also starts to work on question #5. He inputs his answer then clicks outside the box a few seconds after Jill does. Since Matt saved his answer last, that is the answer that is now saved in the system. Jill has not refreshed her page, so she doesn’t know that Matt has since saved over her answer. When she refreshes the page using the Refresh Page button, the system will display the last answer that was saved (which was Matt’s).
Last, collaborators cannot use their collaborator accounts to submit their own applications. This means neither can they submit an application on which they’ve been invited to collaborate nor can they create and submit applications on their own behalf. If you want to be a collaborator on an application AND submit your own application(s), set up your applicant account and create your application first, then let your colleague add you as a collaborator on the other application(s). This will ensure that you have the correct account type to submit your own application later.
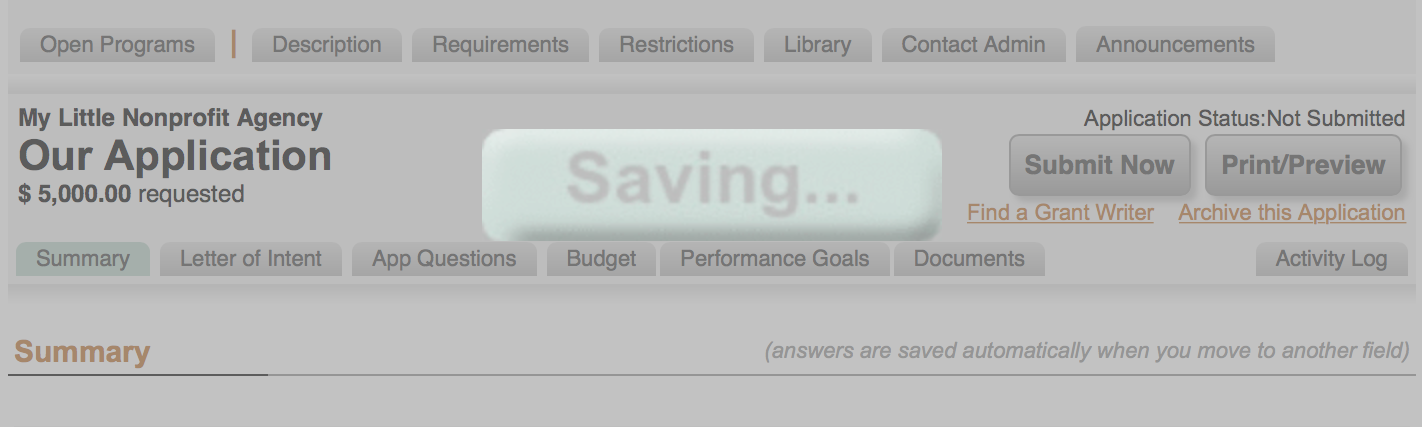
If you see the ‘saving’ screen for more than 5-10 seconds (and depending on the speed of your internet connection), it could indicate one of two things:
- Your internet connection blinked during the saving process; or
- The answer that you have entered (often as a copy-paste function) has an ineligible character that is preventing the save.
Once that screen starts flashing and doesn’t disappear after a reasonable amount of time, it will not disappear on its own. This is the system’s way telling you that your answer hasn’t been saved.
Double click anywhere on the page to turn off the ‘Saving’ screen.
After that, try to edit the answer that you were just working on (add or delete a space in a text question, or choose a different multiple choice or checkbox option), and click elsewhere on the page to try that save again. If the answer saves this time, you’re all set! Keep working on your application, as usual.
If the answer still does not save, it’s time to do some troubleshooting. If you are pasting your answer from somewhere else, are there any formatted characters or sections? Try clearing out any formatting, including bullets, lists, special characters (including characters from non-English character sets), etc. and then paste the answer in and try the save again. If that doesn’t work, try pasting the text in sections, identifying which sections save and which do not. Once you’ve found the section that doesn’t save, check in there for any unusual characters. Are there any words that spell check has found but that appear to be correct? There may be an invisible character in there, sometimes put in by an auto-correct function. Try re-typing the text before copying and pasting.
You can verify what answers have been saved by refreshing the page using the Refresh Page button in the top right section of the page or by checking the latest version of the print preview.
If all else fails, let us know that you’re having trouble, and we can figure out what’s blocking the save. We’re happy to help!
How do I change or reset the email address or password on an applicant account?
The steps for changing the login credentials – the email address and password that you use to log into your account – differ depending on whether or not you still have access to the account and the email address associated with it and if the person who should be the new account owner already has a ZoomGrants account.
- I still have access to the ZoomGrants account.
- I do not have access to the ZoomGrants account, but I do have access to the email inbox.
- I do not have access to the ZoomGrants account or the email inbox.
- The new account owner already has a ZoomGrants account.
IF YOU STILL HAVE ACCESS TO THE ZOOMGRANTS ACCOUNT…
| 1. | Log into the account at http://ZoomGrants.com/login. | |
| 2. | Click the Account Profile button | 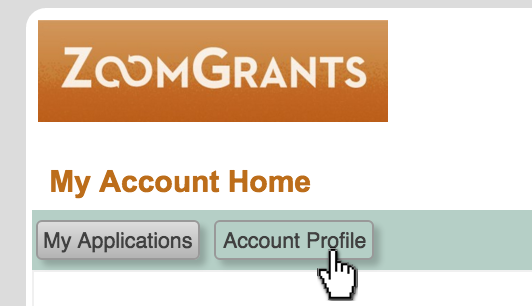 |
| 3. | Click into the Change User ID/Password tab. |  |
| To change the email address… input a new email address in the Email Userid field, input the current password to confirm, then click the Change User ID/Password button. The email address cannot already be associated with a different ZoomGrants account. If the email address is already in use, see the instructions below to request that the account be transferred to another user. | ||
| To change the password… enter the current password, then put in the new password that you’d like to use, and click the Change User ID/Password button to make the change. | ||
Log out of the account, then try logging in with the new credentials. Keep in mind that your browser may still remember the old email address or password, so you may need to type in the credentials manually and updated the saved login information.
IF YOU NO LONGER HAVE ACCESS TO THE ZOOMGRANTS ACCOUNT BUT DO HAVE ACCESS TO THE EMAIL INBOX…
Click the ‘Forgot Password’ link to request that a password reminder be sent to the email address associated with the account. (The message will come from Notices[@]ZoomGrants.com. If you don’t receive it within a reasonable amount of time, you may want to check your spam or junk folder.) After you receive the reminder, follow the steps above to change the email address or password.
IF YOU NO LONGER HAVE ACCESS TO THE ZOOMGRANTS ACCOUNT AND DO NOT HAVE ACCESS TO THE EMAIL INBOX…
We can change the email address on the account for you and can send a new password to the new user. In order to do that, we will need to receive an email request that verifies that the account should be transferred to a new person. That request must come from one of the following persons:
- The original account owner
- The Executive Director of the organization
- A Program Admin with the funding organization
That request should include:
- The email address of the original user (the ‘user ID’).
- The new email address that should be tied to the account.
- An acknowledgment that the original email address should no longer be used to access the account and that the new email address should be the one that is used instead.
Please have the appropriate person (one of the folks listed above) send that request via email to Questions[@]ZoomGrants. Once we receive that request, we will change the account over to the new email address, then send a new password via a password reminder sent to that email address. After that, you can use the steps listed in the beginning to change the password or email address, as necessary.
IF THE NEW ACCOUNT OWNER ALREADY HAS A ZOOMGRANTS ACCOUNT…
We can verify that they have the correct account type then transfer the applications into that new person’s account. In order to do that, we will need to receive an electronic request that verifies that the applications should be transferred to a new account. That request must come from one of the following persons:
- The original application owner
- The Executive Director of the organization
- A Program Admin with the funding organization
That request should include:
- The email address of the original user (the ‘user ID’).
- The new email address that should be tied to the account.
- An acknowledgment that the applications can be moved to the new person’s account.
Please have the appropriate person (one of the folks listed above) send that request via email to Questions[@]ZoomGrants. Once we receive that request, we will move those applications so that the new person owns them in their account.
So you’re pretty sure that you submitted your applicant but the confirmation email hasn’t come through. Sometimes emails get lost. It happens. Be sure to check your spam or junk folder and add Notices[@]ZoomGrants.com to your whitelist or safe senders list to ensure that messages come to you in the future. For now, though, you can verify that your application was submitted in four other ways.
Four Ways to Verify That Your Application Was Submitted
1. In your application, the Submit button is replaced by a timestamp of when the application was submitted.
After you’ve clicked the Submit button, entered your initials, and submitted the application, you can refresh the page and check to see if the button has been replaced by a date and timestamp (in Pacific time) indicating when the application was submitted.
2. In your application, the Activity Log has an entry indicating that the application was submitted.
Click into the Activity Log tab* and look at the bottom of the entries. If the application was submitted, there will be two date and timestamped entries indicating when the application was submitted.
*This might not be available to you if the administrator has chosen to hide that tab from applicants.
3. On your My Account Home page, the application has moved from the Incomplete section to the Submitted section.
Log into your account on our homepage – https://ZoomGrants.com/login – or click the My Account Home or My Applications button in the upper left corner of your account (below the organization logo) to go to your My Account Home page. Click into the Submitted section to verify that the application is now in that area.
4. In the Print Preview, there is date and timestamp of the application submission.
Open up the Print Preview or PDF of the application and check for a date and timestamp in the box in the upper left section of the application, under the amount requested (if you were requested to provide that information).
Think back to when your account was created…
| Did you create your own account? | OR |
Did you receive an email invitation to collaborate on an existing application? |
|
You likely have an Applicant account. Applicants can create their own applications.
Please see this help article for more information: |
You likely have a Collaborator account. Collaborators can work on others’ applications but cannot create their own.
Please see this help article for more information: |
|
|
If you continue to have trouble creating an application after reading over the above resource, feel free to contact us. |
If there is someone else at your organization who already has an applicant account, consider asking them to create the application and invite you as a collaborator. This will ensure that all of your organization’s applications stay in a single account. If you need to be the person who owns your organization’s account, please read the last section of this article then contact us. If you still need to submit an application or are not part of an organization, anyway, we can change your account type for you. Please contact us with that request. |
You’ll need to have a ZoomGrants account in order to be able to submit an application to an organization that is using ZoomGrants to receive applications.
Setting Up Your Account
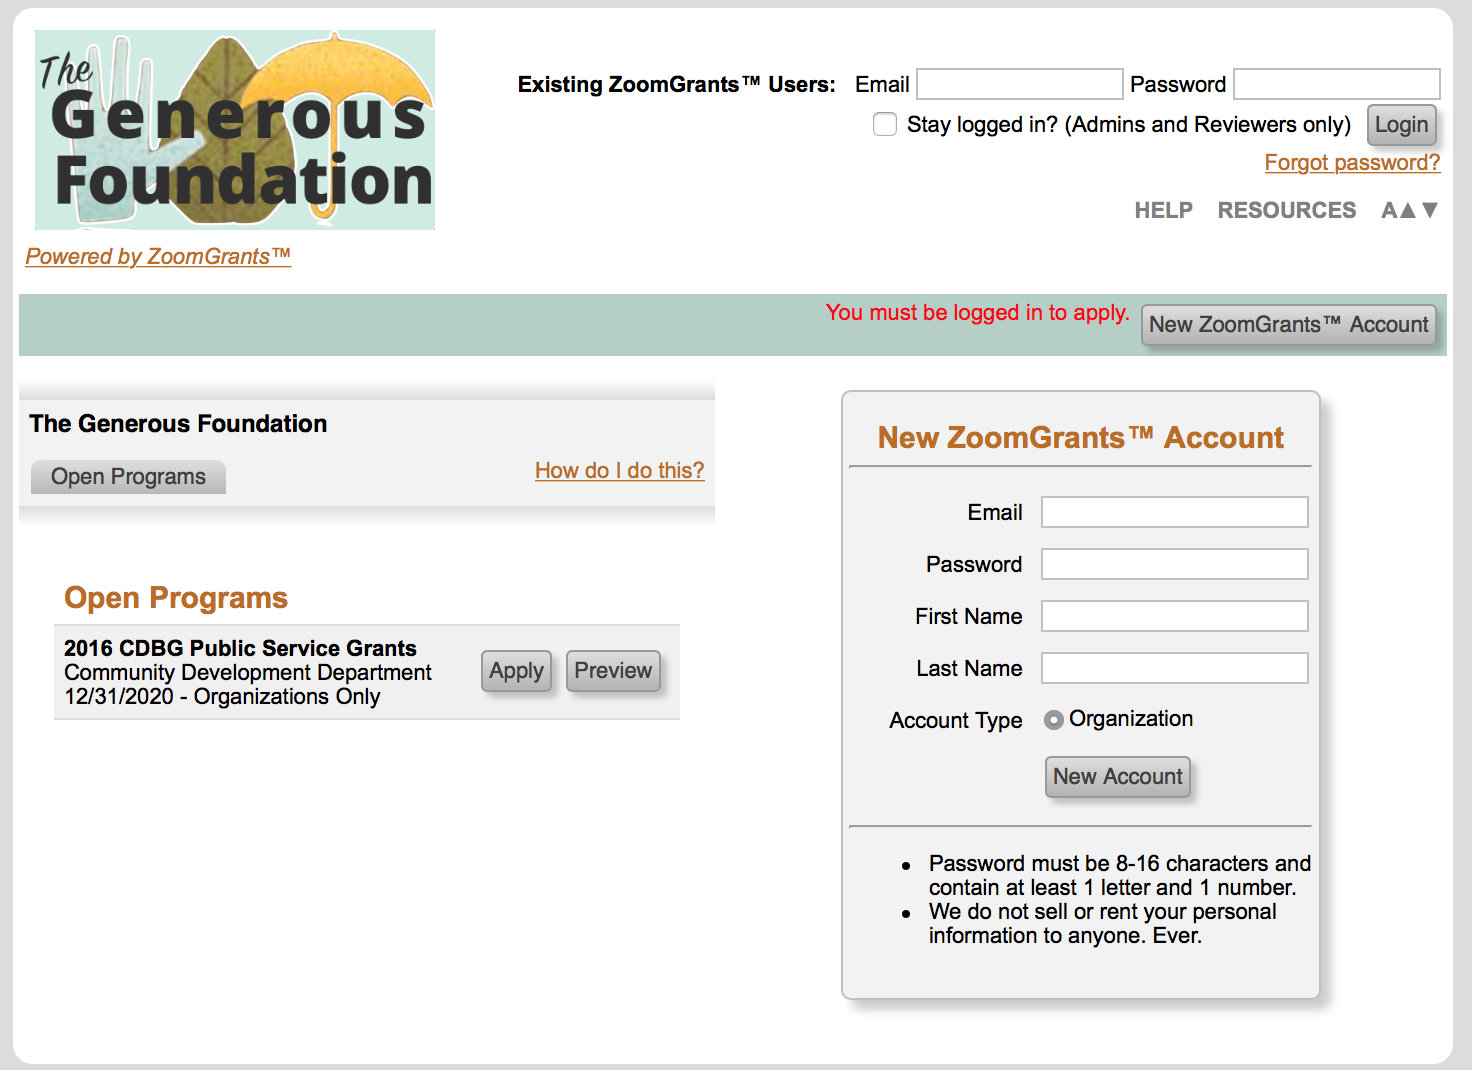
You can create a ZoomGrants account by following a link provided by that organization. The page may look something like this:
You cannot create an applicant account or find the program on our homepage nor can we send you the link to the program. The administrator with the funding organization is responsible for providing access to the program, so you’ll need to go through them.
Once you’ve found the page, use the New ZoomGrants Account box on the right side of the page to create your account.
If you are signing up to submit applications on behalf of an organization, here are a few things to keep in mind as you consider who should be the account owner:
- Each organization account is owned, accessed, and managed by a single set of login credentials (email address and password). If you will have multiple people who need full access to the applications in your account, we recommend setting the email address associated with the account to either be the person who will be primarily responsible for managing your organization’s applications or a general email address, perhaps even an alias that sends emails to multiple people who will be managing your applications.
- Additional users can be added to individual applications within the account. If you have a colleague who just needs access to one application and someone else who is in charge of submitting the invoices for all of your approved applications, the account owner can give that access to those individuals by adding them as Collaborators on the appropriate applications. If you have certain people who should receive email notifications pertaining to a specific application, you can add them as Additional Contacts on that application.
- If the account owner leaves your organization, make sure they have shared their latest account credentials before they leave so that you can continue to access the account. If they have already left and you don’t have the account credentials, submit a support request so that we can help you transfer the account to someone else and set up a new password.
Once your account has been created, you’ll receive a confirmation/welcome email from Notices[@]ZoomGrants.com. Because nearly all notifications from ZoomGrants come from that email address, please be sure to flag that message as not spam, add that email address to your list of safe senders, or add the ZoomGrants domain to your whitelist to ensure that messages from ZoomGrants are delivered to your inbox.
Creating Applications
After you’ve created your account, you can start your first application by clicking the Apply button next to the appropriate program.
The page will reload to display your newly created application. If the admin is requesting an application or project title, fill in that field so that you can quickly identify which application you are working on. If you’re going to be completing your application in one sitting, click the grey Refresh Page button in the top right section of the page.
After creating your first application, you can create additional applications (if the program administrator is allowing multiple applications to be submitted) by opening up your first, original application, then clicking the Open Programs tab in the upper left section of the page. If the admin is allowing applicants to submit multiple applications, you will see an Apply Again button. Click it to create a new application.

After you’ve created your account and your application(s), you can continue to log in via the link provided by the organization, or you can log in on the login page of our website – http://ZoomGrants.com/Login.
As you work through your application, inputting your answers and moving into the next fields, you’ll see the flash of a ‘saving’ screen that indicates that your answer was saved.
Because of this auto-save feature, you do not ever need to intentionally save your application. As soon as you click outside of a field when you are done typing your answer and you see that ‘saving’ screen flash then disappear, your application has been updated and the latest version was saved. (Saving screen stuck? Read this.)
The same concept applies if your application has been opened for editing or was updated after it was submitted – as soon as you see that ‘saving’ screen flash then disappear, the program administrator and committee can see the latest version of your answers. You do not need to re-submit your application.
As a note, archiving an application is NOT the same as saving it. If you archive an application, you are indicating that you do not intend to submit that application. You will no longer receive email communications sent by the program administrator regarding that application. Additionally, archiving an application will actually move the application from the Incomplete section to the Archived section. We recommend archiving an application only if you do not intend to submit it.
If you’re having trouble finding your application after you’ve started working on it, this article may help: https://zoomgrants.zendesk.com/hc/en-us/articles/215757028-Where-did-my-application-go-
If you’ve submitted a pre-application, application, invoice, or report and you find that you need to update and re-submit it, your best bet is to contact the program admin with the organization that is using ZoomGrants. Our tech folks don’t have the authority to un-submit any components and cannot return anything to you for editing. Contact the admin by clicking the Contact Admin tab in the application in your account or via whatever contact information was provided to you by the organization.
Pre-Application Updates
Contact the administrator and request that they un-submit your pre-application. Once un-submitted, you can edit then re-submit that component.
Application Updates
Contact the administrator and ask if they are allowing changes to be made to submitted applications. In some cases, changes can be made up until the deadline without any special permission from the admin. In other cases, your application may need to be opened for editing.
Whether the updates are already allowed or your application has been opened for editing, you can make your changes and they will be auto-saved. Once saved, you can open the print preview of your application or click the Refresh Page button in top right area of the page to verify that those changes are reflected in the application data. There is no re-submit process. If those changes have been saved, that new information is also visible to the administrator. If they’ve requested that you contact them when your updates have been made, you can do so via whatever method they’ve specified.
Invoice Updates
Contact the administrator and request that they return that invoice to you for editing. Once returned, the invoice will appear in the financial tab of your application as Not Submitted, and you can open, edit, and re-submit it. (You can learn more about submitting invoices here.)
Report Updates
Contact the administrator and request that they return the report to you. Once returned, you can update the information and re-submit it. (You can learn more about submitting reports here.)
Quick question: Are you the application owner (the person who created the application and controls the applicant account) or a collaborator?
Some programs feature a Pre-Application that needs to be submitted and approved before the rest of the application can be completed.
If you can fill in the first and second tabs of the application but can’t complete the content in any of the other tabs, there is a Pre-Application that must be vetted by the program administrator before you can finish the application. (Keep in mind that the administrator can re-name all of the tabs in the application, so there may be a Pre-Application but with a different name – Letter of Intent, Eligibility Test, etc.)
If there is a Pre-Application, you’ll see a Submit button at the top of that tab, like this:
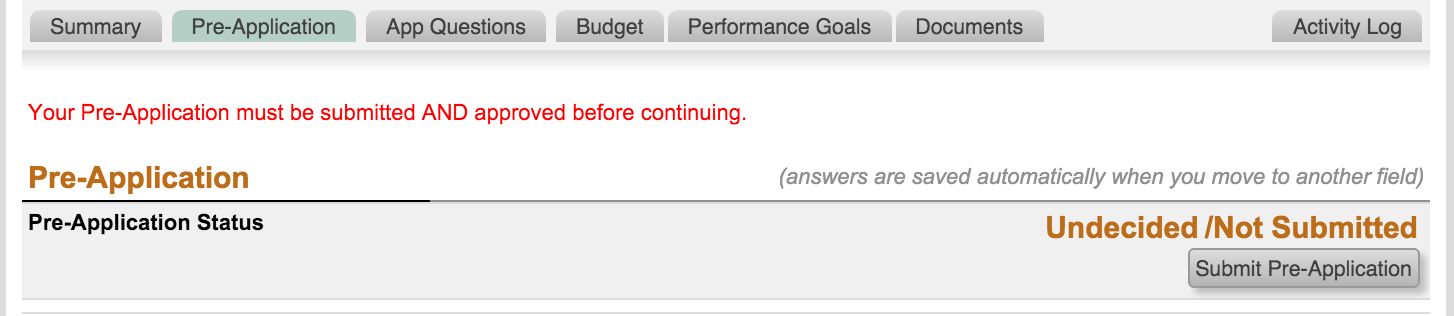
The bright red messages at the top and bottom of the tab also provide an indication that the Pre-Application must be submitted and approved before the rest of the application can be completed.
When you’ve filled out the general information fields in the first tab and completed the Pre-Application, click the Submit button. An administrator will review your submission and make a decision. As soon as a decision is made, you will receive an email to convey that decision.
If your Pre-Application is approved, you will be able to complete the rest of the application.
If your Pre-Application is declined, you will not be able to complete the rest of the application.
Note: ZoomGrants staff is not part of the decision process. If you have questions regarding the status of your submission, please use the Contact Admin tab in the application in your account to send an email to the Program Contact.
A Note for Collaborators:
Uploading documents to your application is a snap and follows a process similar to attaching a document to an email.
Click the Upload button next to a Document Request to open the File Upload Window.
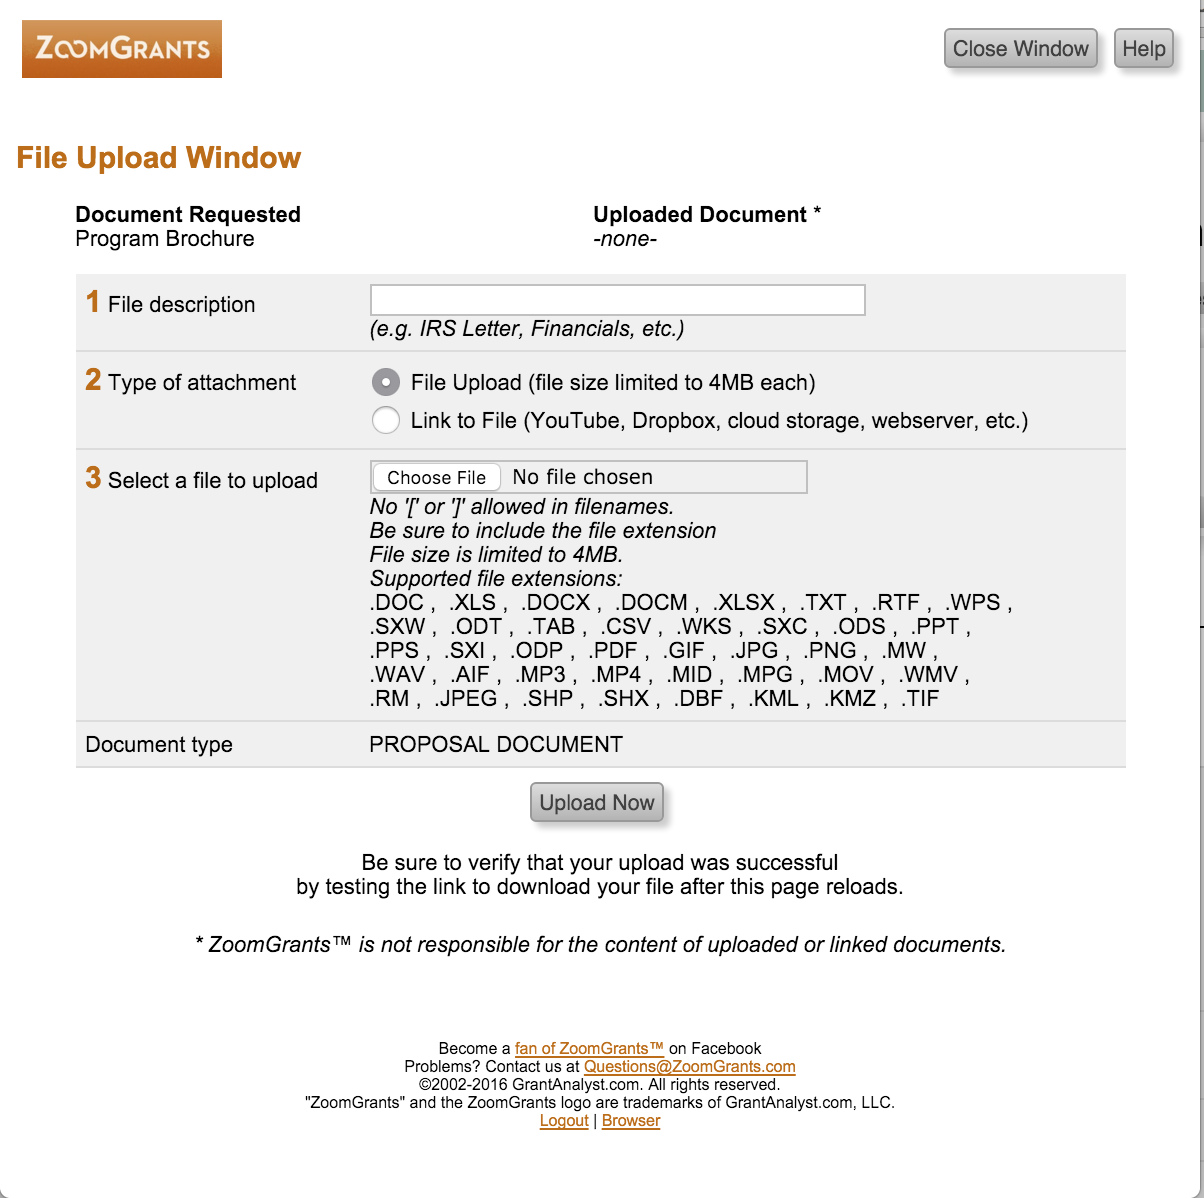
In the File Upload Window, there are four steps to upload/attach a file to your application:
- Enter a file description. This can be a short document title, a label that describes what the document is (IRS Letter, Scanned Receipts, Recommendation Letter, etc.), or a generic title. The file description does not need to match the file name on your computer.
- Choose the type of attachment. You can either upload the file directly, meaning that we’ll take a copy of the file on your computer and will put it onto our server, or you can provide a link to the file, if it is already stored on the internet somewhere, such as in cloud storage or on your website.
-
Choose the file to attach.
- IF YOU’RE UPLOADING A FILE: Select a file to upload. Click the ‘Choose file’ button (depending on your browser, that button may say something else) to open up the window where you can locate and select that file from wherever it is stored on your computer. You will need to find that file in that window, then double click it or select it then click the ‘Open’ button at the bottom of the window (again, depending on your browser, that button may say something else). That will tell the system what file you want to attach to your application.
NOTE: Uploaded files must be smaller than 4MB in size. Files that exceed this file size limit should be split into multiple documents or attached as a link (below) rather than an upload. - IF YOU’RE PROVIDING A LINK TO THE FILE: Paste the link into the field. If the file is on your website, provide the link that goes directly to the document. If the file is on cloud storage, get the link to the document.
NOTE: After providing a link, do not remove or move the document from wherever it is in cloud storage. Doing so will prevent that document from being viewed by the funding organization. If you need to move the document, contact the administrator to let them know that the link will be rendered invalid.
- IF YOU’RE UPLOADING A FILE: Select a file to upload. Click the ‘Choose file’ button (depending on your browser, that button may say something else) to open up the window where you can locate and select that file from wherever it is stored on your computer. You will need to find that file in that window, then double click it or select it then click the ‘Open’ button at the bottom of the window (again, depending on your browser, that button may say something else). That will tell the system what file you want to attach to your application.
- Click the Upload Now button.
When the file has been uploaded/attached, you’ll see a red confirmation message, like this:
![]()
To test your attachment, click the link in the File Upload Window.
If the file is a Word, Powerpoint, or Excel file, a preview will open in a new window. If the file is a PDF, it may open automatically or it may download onto your computer (depending on your browser settings). If downloaded, the download may require a blank page to be opened. You can close it once the file has downloaded. If it does not open automatically, check in your downloads folder to find the file.
You can also watch our quick tutorial video about uploading files here: http://youtu.be/b0Ixkjss_Ow
If there is no visible ‘Submit’ button in your application, that is indicative of one of several things:
- You are a collaborator on the application. If you log into your account at http://ZoomGrants.com/invitations.asp, or you see a red ‘Invited as a Collaborator’ message on your My Account Home page, you are a collaborator on the application. Collaborators can only contribute to the content of the application, whereas the official applicant owns the application. Collaborators cannot submit, archive, or delete an application, nor can they edit the Applicant and Organization Information sections in the first tab of the application. To submit the application, contact the application owner. They will be able to submit it from their account.
- The application has already been submitted. In some cases, the administrator may choose to allow applicants to edit applications after they are submitted. In that case, you can submit your application then continue to make changes up until the deadline. As soon as your edits are saved (when the ‘Saving’ screen flashes then disappears on its own), the version that is viewable to the committee members and administrators is automatically updated with the latest changes. There is no re-submit button. Once an application is submitted, the ‘Submit’ button will permanently disappear. To submit the changes, they only need to be saved.
(NOTE: The program administrator decides whether or not to allow changes to be made to submitted applications up until the deadline. Please check in with the program admin (not ZoomGrants staff) to ask if they have chosen to allow edits to submitted application.) - The deadline has passed. If you are the application owner (not a collaborator) and you have not already submitted the application, it is possible that the program deadline has already passed. The program admin can control the program deadline manually, so they decide when the program closes. As soon as they close the program, any incomplete applications can no longer be submitted. To submit the application, you will need to contact the program admin (not ZoomGrants staff) to request permission for a late submission.
(NOTE: If you have technical difficulty submitting the application, it is critical that you contact the ZoomGrants Support Team as soon as possible. We can help you but we will need time to address your issue. We strongly recommend never waiting until the last minute to submit your application, as there could be questions that you accidentally skipped, documents that you forgot to upload, or local connectivity issues such as a faulty internet connection in your home or office that prevent you from being able to submit, just as there could be printer problems, traffic jams, and inclement weather that prevent submission of a paper application. Please do your work early and submit well in advance of the deadline.)
If you don’t think any of the above situations apply to you and you are still unable to see a ‘Submit’ button, contact our Support Team for additional assistance. We’re happy to help!
If you’re having trouble finding your application, start by logging in at http://ZoomGrants.com/login.
When you log in via our homepage and you are an application owner, you will always start out at your My Account Home page. This page features multiple sections – Incomplete, Submitted, Approved, Declined, and Archived.

Applications that have not yet been submitted in programs that are still open and accepting applications or applications that have been opened for editing by the administrator will be in the Incomplete section.
Once submitted, applications are moved from the Incomplete to the Submitted section.
When an administrator approves or declines an application then changes a setting to allow the applicant to see that official decision, the application is moved from the Submitted section into the Approved or Declined sections, accordingly.
(If you have received notification from the admin that your application has been approved, but you are still seeing it in the Submitted section, they may have skipped a step and not yet allowed you to see the decision in your account. Let them know that they need to complete that step, or, if you’d prefer we contact them, send us a support request and we will get that taken care of.)
If an application is still incomplete (not submitted) when the program closes, it is automatically moved into the Archived section. Applications that are intentionally archived are also moved to the Archived section.
Be sure to check for your application in all of the relevant sections.
If you’re still not finding the application, you should consider if the application may actually be in someone else’s account. Each user’s account is accessible via one set of login credentials, so it could be that the application you are looking for is in one of your colleague’s accounts.
Contact us if you continue to have trouble. We can often help track down an application.
If you do not own any of your own applications and you do not land on the My Account Home page when you log in, you are a collaborator and therefore will only be able to access applications if the application owner expressly gives you access to the application. You can read more about collaborators here.
For more information on how to submit reports and invoices, check out this ZGU class:
https://zoomgrants.zendesk.com/hc/en-us/articles/230791927
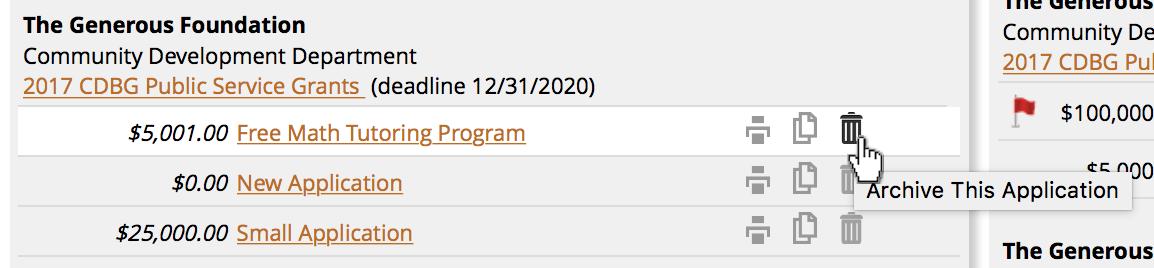
If you want to permanently delete an application, you’ll need to archive it first, then delete it.
(If you need help finding your application, read this: https://zoomgrants.zendesk.com/hc/en-us/articles/216261458-Finding-Your-Applications)
| 1. |
Archive the application.
|
|
| 2. |
Click the My Account Home button to return to your My Account Home page. (If you’re already on that page, just let the page reload and skip this step.) |
|
| 3. |
Click into the Archived section. |
|
| 4. | Click the trashcan icon to permanently delete the application. |
Once you delete an application, it cannot be restored.
The best way to retain access to your organization’s primary applicant account is to be proactive. Make sure that you have a plan for who will take over the account when the primary applicant leaves and how the login credentials will be shared with your team.
- Ask that the person who is leaving share their login credentials with you.
- Update the account credentials for the new person who will manage the account.
- If the new email address to be tied to the account is not already in the system, request that they update their account credentials. Learn more here.
- If the new email address to be tied to the account is already in the system, submit a request to merge the two accounts or to move the applications from the old account into the other account. Learn more here.
- Use a generic email address and password on your applicant account, if multiple people need full access to the application or if you anticipate a high level of user turnover.
If the person has left your organization and you do not have access to the account or to their email inbox to retrieve a password reminder, you can submit a request to have the account transferred. Learn more here.
The first thing to know is that ZoomGrants requires organizations to own and manage their own accounts. There are some fields (such as the Applicant and Organization Information fields) that are tied to the account and, when updated in one application, are updated in all of the applications in the account.
This makes it easy for applications submitted previously to continue to have updated contact information. This also means that applicant accounts cannot be used to submit applications on behalf of multiple organizations. Therefore, grant writers need to have their own accounts and be invited as collaborators on the applications in the accounts owned by the organizations that have requested the assistance of the grant writer.
In short, any organization that is using you as a grant writer must have their own account, and you need to be added as a collaborator on the applicable applications within their account.
Collaborator access will give you the ability to work on the fields in the application (except the Applicant and Organization Information fields – those are editable only in the organization account) and upload documents. The final submission of the application must take place in the applicant account.
Later, if the application is approved, you can also be given access to submit invoices or post-funding reports within that application.
If you are using Grammarly or another browser extension to edit the text in your application, please read this important note:
The changes that you make in your text in the extension interface may not be automatically saved in your application.
To ensure that your updates are saved after you have closed the extension pop-up, click back into the text box on ZoomGrants and add a space to the end of the text, then click outside the box.
You should see the flash of the ‘Saving’ screen to verify that your update, including all of the changes that you made in Grammarly or the other extension, was saved. If you’d like to triple check, you can use the Refresh Page button in the upper right section of the application to reload the page and display the latest saved answers.