
Reviewer access to programs and the applications within them is customizable for each program and can be as open or restricted as necessary. Admins decide who has access to what and when.
How It Works
How to Set It Up
Program Setup > Committee Tab
- Committee Tab
From Program Setup, navigate to the Committee tab to begin your setup.
Choose your review settings.
NOTE: For the sake of conversational integrity, comments, once added to the discussion, are not removable. Please instruct your reviewers and admins accordingly.
Assigned Review
Allows admins to assign applications to be reviewed by individual reviewers or committee groups. Assigned Review options include:
No Assignments – All reviewers can access, read, and review all applications.
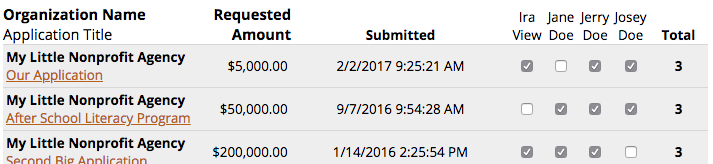
Individually – Applications are individually assigned to each reviewer who has been given access to the program.
- Check the boxes next to the reviewers to whom you would like to assign the applications in that program.
- Click Assign Applications.
- In that window that opens, put checks in the boxes to assign applications to each reviewer.
By Committee Groups – Reviewers are assigned to committee groups and then applications are each assigned to a committee.
- Name your committees.
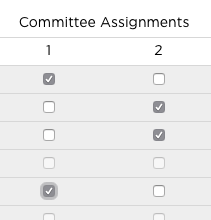
- Reload the page.
- Put checks in the box(es) to add your reviewers to the committees (as shown in the screenshot).
- Click Assign Applications.
- In that window that opens, use the dropdowns to assign each application to a committee.
Review Assigned Applications Only
Restricts reviewers in an assigned review from accessing the applications to which they have not been assigned.
If set to ‘No’, reviewers can read all of the applications but they only have access to the Review Tools to truly review the applications to which they have been expressly assigned.
Track Committee Conflicts
Present a conflict of interest statement in each application to be reviewed. Reviewers can indicate whether or not they have a conflict of interest on each application.
Reviewers make their selection, explain their conflict (if they have one), enter their initials, then click a Certify button. We’ll stamp the conflict statement, their certification, initials, the date and time, their email address, and their IP address. You can pull up all reviewer conflict statements in a special report (see Viewing the Conflict Report, below).
Committee Conflict Statement
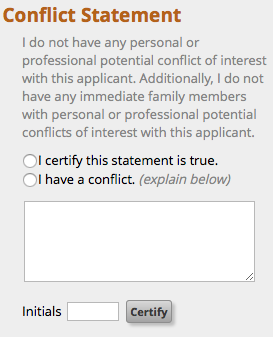 This is the text that is presented as the conflict statement to each reviewer on each application. When crafting this statement, keep in mind that reviewers will have two options in response:
- I certify this statement is true; or
- I have a conflict
Your statement should be written in a way that makes those valid choices for your reviewers.
Give your committee access.
Assign reviewers to your committee.
In the Committee Members section at the bottom of the Committee tab, choose which reviewers you’d like to give access to this program.
You can make any reviewer with access a Committee Chair, which gives them additional capabilities. Read more about those particular capabilities on the setup page, below the list of reviewers.
Assign non-senior admins to this program.
Program Setup > Settings Tab > Administrative Users
- Settings Tab
To assign non-senior admins to your program, navigate to the Settings tab.
How to Use It
Tracking Reviewer Progress
Individual Applications
Click into the Review Tools on an application and scroll down to the Committee section near the bottom of the page to view the list of reviewers who have access to that application. There, you’ll see a general overview of how each reviewer is doing, including:
- A progress bar showing their movement through the scoring questions (if applicable)
- Their vote on the application (if you’ve turned that feature on)
- Their conflict statement
All Applications
If you’re using the Scoring feature, The Scoring Report provides a great overview of how your reviewers are moving through the applications. Check out the different report types to see which applications reviewers have scored and how far they’ve gotten.
Removing a Reviewer from an Application
If necessary, reviewers can be removed from individual applications (perhaps because they have a conflict of interest).
In an application, click the Review Tools button. Scroll to the Committee section near the bottom of the page, and uncheck the box next to the left of the reviewer that should be un-assigned.
Deleting a Review
- In an application, click the Review Tools button.
- Scroll to the Committee section near the bottom of the page.
- Click the Delete Review button next to a reviewer to remove their review from the system.
Viewing Reviewer Conflicts
Click into the Review Tools then scroll down to the Committee section near the bottom of the page. There, you can see the conflict
Exporting a Committee Conflict Report
Your Program > Data Tab > Standard Reports & Exports
- Data Tab
Navigate to the Data tab and click on the Conflict Report in the Standard Reports & Exports section on the right side of the page to pull up the conflict report for that program.
The report shows each application and each reviewer’s selection in the conflict statement, including whether or not they have a conflict, their signature, and their comment (as applicable).
Click the Export to Excel button to send that data to a spreadsheet file for your records.